EMAIL - FAQ's
How to use webmail to access your e-mail account
You can use either the webmail interface or an email client. If you need help configuring email clients
You can easily access your WebMail interface by just visiting: http://www.yourdomainname.com/webmail, where ‘yourdomainname.com’ is your actual domain name. If this is not working for you, it might be possible that your ISP is blocking the access to non-standard ports loaded through an SSL connection. In this case, please use: http://webmail.servername.com, where ‘servername.com’ should be the name of your server (e.g. http://webmail.diasdomains.com).
If you login to your webmail through the Webmail icon on your cPanel main page, you will be logged in with the default system email account.
Please do not use the default email account, because very often emails send from the system email accounts are going to the Junk folders.
In order to use your email you have to create another email account with the same or different username.
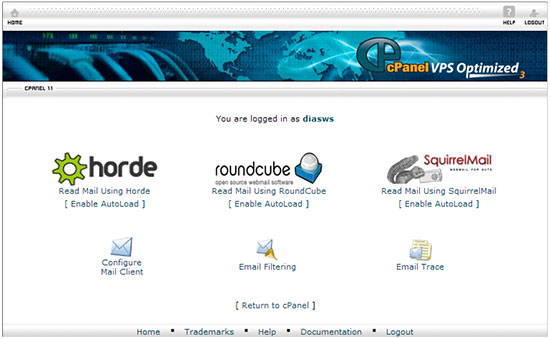
To login to one of your e-mail accounts from your cPanel, you should go to Email Accounts and then click the Access Webmail link next to the account you wish to access. Then you should type in the password corresponding to the account and click on Login.
How to send e-mail messages via webmail?
You can easily send email messages through the webmail client you have chosen. Just find the New message button in Horde, the Compose button in Squirrelmail or the Create a New Message button in RoundCube and you will be able to start writing your message.
Make sure to SAVE your message if it is too long or you want to write it for a longer period of time. The web mail program may drop the connection and you might lose your email.
How to configure email clients
You can use either the webmail interface or an email client. Check our tutorial on how to use cPanel webmail.
If you decide to use an email client, such as Microsoft Outlook Express, MS Outlook, Mozilla Thunderbird and Eudora, see below for the correct settings needed.
Here are the settings you need:
- Incoming mail server (POP3/IMAP server): mail.yourdomainname.com
- Outgoing mail server (SMTP server): mail.yourdomainname.com
- Username: the full e-mail address. Example: you@yourdomainname.com instead of you.
- Password: Assigned in cPanel -> Email Accounts.SMTP authentication must be enabled for the login to be successful.
If you have your domain pointed to an external server and the MX record is resolving to one of the diasws servers use the server name as the Incoming/Outgoing mail server.
You can also use secure authentication to your mail server.
Email ports
- The POP3 port for inbound emails is 110 – (995 if you want to use secured POP3)
- And the IMAP port for inbound emails is 143 – (993 if you want to use secured IMAP)
- The SMTP port for outbound emails is 25, or 26 – (465 if you want to use secured SMTP)
Email protocols & Definitions:
What is POP3?
Post Office Protocol version 3 (POP3) is a standard mail protocol used to receive emails from a remote server to a local email client. POP3 allows you to download email messages on your local computer and read them even when you are offline.
What is IMAP?
The Internet Message Access Protocol (IMAP) is a mail protocol used for accessing email on a remote web server from a local client. IMAP and POP3 are the two most commonly used Internet mail protocols for retrieving emails. Both protocols are supported by all modern email clients and web servers.
Main difference between IMAP and POP3:
The POP3 protocol assumes that there is only one client connected to the mailbox. In contrast, the IMAP protocol allows simultaneous access by multiple clients. IMAP is suitable for you if your mailbox is about to be managed by multiple users.
What is SMTP?
Simple Mail Transfer Protocol (SMTP) is the standard protocol for sending emails across the Internet. SMTP uses TCP port 25 or 2525 and sometimes you can have problems to send your messages in case your ISP has closed port 25
Blocked extensions for email
The following list of extensions are blocked from the server:
ad[ep]|ba[st]|chm|cmd|com|cpl|crt|eml|exe|hlp|hta|
in[fs]|isp|jse?|lnk|md[be]|ms[cipt]|pcd|pif|reg|scr|sct|shs|url
If you are trying to receive or send and file that have these extensions, it will not be sent. If you want to send it, please zip the file buy using winzip and then send it. These extensions are blocked for security reasons because they have the same extensions as some viruses.
Comcast blocking port #25
see full article here:
How do i back up my emails in outlook express?
Here are the official links to the procedures from Microsoft:
link to backup and restore:
http://support.microsoft.com/kb/270670
link for profile files:
http://www.insideoe.com/files/store.htm
How do i setup a catchall address?
First, let’s go through what a catchall address is. Usually email accounts at a domain have a specific user@domain syntax.
By setting up a catchall address, you are essentially telling the mailserver that there is only one account at that domain, and mail addressed to @domain will be dealt with in a similar fashion.
To access the Default Email Address setup tool, login to cPanel, Select the “Mail” Icon, and then click on the “Default E-Mail Account” link.
Once you have selected the account you would like to set as a catch-all, you have 3 options as to what you can do with the email that is sent to that account.
1) Forward the email address to another account (you can do this by simply entering an email address in the text field)
2) To discard any mail sent to that catchall (you can do this by typing in “:blackhole:” without the quotes in the text field)
3) You can reject any email sent to the catchall, and have a bounce message sent back to the sender informing them that the address they sent to does not exist. (you can do this by typing in “:fail:” without the quotes in the text field)
Once you have selected and followed one of the three options, click “Change” and your catchall will now be active.
Please Note: A Catchall email address does not apply to e-mail accounts already setup in that domain. For example, if you have the email accounts user1@example.comanduser2@example.com setup, then the catch-all will apply to mail sent to every account BUT those.
I am able to receive and check my mail, but cannot send it using my mail client. What could be wrong?
Step #1:
Make sure that your firewall isn’t blocking your mail client’s attempts to connect to the SMTP server.
If this is the case, consult your firewall’s documentation to find out how to let the client go through the firewall.
If the firewall isn’t the problem, then it might be your ISP.
Step #2
Many ISP’s nowdays block port 25 (the default SMTP port) in an effort to reduce spam. A simple solution is to change the SMTP port in your mail client from 25 to 26. If this doesn’t work, you may need to contact your ISP to find out what you have to do in order to access an outside SMTP server.
If both your firewall and ISP are okay, then the SMTP server might be down. Although we regularly check the status of all our services, you can help us identify and fix the problem faster.
*** Additional Supplemental Information: ***
General Outgoing SMTP Port settings per ISP: (subject to change per ISP)
Comcast is known for blocking ports 25 and 26, their solution is to use Port #587. once you have changed this to port #587, it should resolve the problem.
For more information about comcast’s email settings, see the following links:
- http://forums.comcast.com/t5/E-Mail-and-Xfinity-Connect-Help/E-Mail-Client-Settings-customer-generated/td-p/778889
- http://customer.comcast.com/help-and-support/internet/email-client-programs-with-xfinity-email/
For Verizon Fios Customers:
setting up email with an iPad / iPhone
Click on Mail in your Settings app
- Select Other
- Add Main Account
- Name: Your Name
- email: your@email.com ( full email address )
- pass: your password
- Description: Add your description
- Next
- Choose IMAP or POP (IMAP is Preferred)
( IMAP will sync emails with your server, so if you delete an email on your iPhone or iPad, it will be deleted from your server as well. POP only downloads the email, so you can set up an option to leave a copy on the server for downloading later, from a desktop for example. )
Under Incoming Server
- Host Name: mail.domainname.com ( enter your domain name here )
- Username: your@email.com ( full email address )
- Password: your password
Under Outgoing Server
- Host Name: mail.domainname.com ( enter your domain name here )
- Username: your@email.com ( full email address )
- Password: your password
If “Cannot Verify Identity” message pops up, choose Continue (This may pop up twice.)
- Click Save
- Now, go back into the new account, and click on the email account to edit.
- Click on Advanced.
- Turn off the Use SSL
- Click the back to Account button in the top left corner
- Click Done.
Your account should be set up.
Why am i not getting all my emails?
sometimes in a rare occasion your email client (outlook) may reject emails. this does not happen if you use the webmail we offer, but if you feel that you might not be getting all your emails, please check and make sure that you have “My server requires authentication” enabled on your email application (outlook) to do so, see the instructions below for your version of outlook:
=========
1. Outlook 2000
Go to Tools > Services (or Tools > Accounts, if Services is not listed). Select your Internet E-Mail Account and press “Properties.” Go to the “Servers” tab, and check “My server requires authentication” under Outgoing Mail Server. Press “Settings,” select “Use same settings as my incoming mail server,” then press “OK” three times to save the changes & return to Outlook. Finally, restart your computer.
2. Outlook 2002 & 2003
Go to Tools > E-Mail Accounts. Select “View or change existing e-mail accounts” and press “Next.” Select your Intermedia.NET POP/SMTP account and press “Change.” Press “More Settings.” Go to the “Outgoing Server” tab, and check “My outgoing server (SMTP) requires authentication.” Select “Use same settings as my incoming mail server” and press “OK.” Press “Next,” then press “Finish” to confirm your changes and return to Outlook. Finally, restart your computer.
3. Outlook Express
Go to Tools > Accounts. Select the “Mail” tab. Select your Intermedia.NET account and press “Properties.” Go to the “Servers” tab, and check “My server requires authentication” under Outgoing Mail Server. Press “Settings,” select “Use same settings as my incoming mail server,” then press “OK” twice times to save the changes, then press “Close” to return to Outlook Express. Finally, restart your computer.
=========
Setting Up Email Accounts in Gmail
1. To begin, open Gmail and click on the gear icon at the upper-right of the browser window and select Mail settings.
2. In the links across the top of the Settings window, click Accounts and Import.
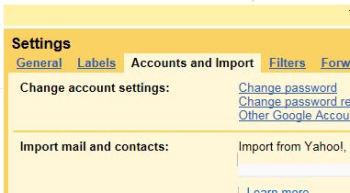
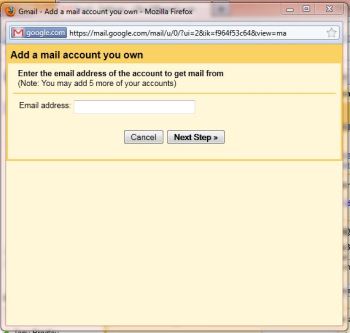
3. In the section labeled Check mail using POP3, click the Add POP3 email account button.

4. Type in the email address for the account you want to set up.
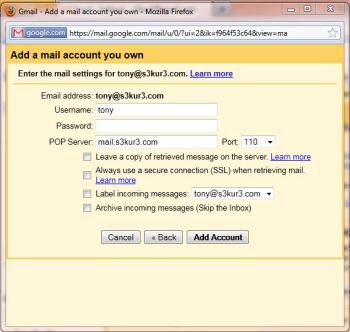
5. Next, you must enter the credentials and server information for your email account. Type in the username and password for your email account, and the incoming server information.
I checked the box to leave a copy of retrieved messages on the server so I can make sure my emails are also retrieved by my other PC, my iPhone, and my iPad. Unless you have been directed to use SSL or some other port, you should leave the port on 110 which is the default for inbound POP3. If you have multiple email accounts, you can also choose to label incoming messages to make it easy to identify which account it came in on.
6. Once you have entered the information, click Add Account.
7. Gmail will verify that the account credentials and server are valid, then ask if you would also like to be able to send outbound email using this account.
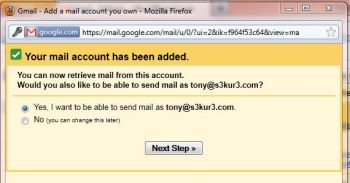
8. You have the option of specifying your outbound email server and credentials, or setting the outbound messages to go through the Gmail server.
Warning : If you choose to use the Gmail server, your emails will appear to come from your default Gmail account rather than from the specified email account. For example, the recipient will see ‘s3kur3@gmail.com on behalf of Tony Bradley’ as the sender rather than just Tony Bradley, or just tony@s3kur3.com.
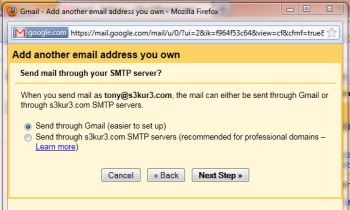
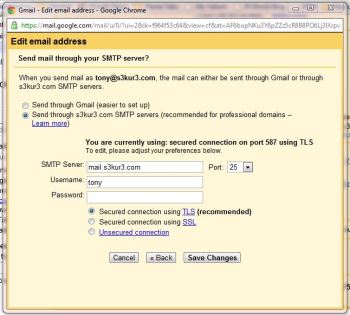
9. If you choose your own server, you must enter the username and password credentials, and the outbound server information to use. You also must specify whether to use SSL or TLS encryption for outbound messages. If you just want to send unencrypted SMTP email, click the port drop-down list on the right side of the screen and choose 25–the default SMTP port. Then a new radio button choice will appear below for Unsecured connection along with a warning from Google recommending that you not send your email messages unencrypted.
10. Regardless of whether you choose to send outbound email through the Gmail server, or with your own outbound mail server, Gmail requires that you verify that you are the legitimate owner of the email account to complete the process. A verification code will be sent to the email address and you must either click on the link in the email or manually enter the verification code to be able to start sending email from this account.
Voila! Setting up email within Gmail is actually quite simple. The only issue I ran into is that one of my email accounts uses TLS encryption on a custom port number, but Gmail only lets you select the default ports, so I was unable to set that account up for outbound email using my own server details. I set it to use the Gmail server, but that solution is less than ideal due to the Warning message in step 7.
But, it works. Now I don’t have to use Outlook because all of my email messages are received in Gmail, and I can send messages from any of my accounts through Gmail as well.
Too much spam? try SpamAssassin
i don’t generally recommend enabling a spam filter on hosting accounts. reason for this is because they do generate false positives and may block emails that you should get. i do get requests to do something about the large amount of spam a user gets. there is a simple solution i can provide that can help. its called SpamAssassin.
by default, i have this turned OFF on all accounts. just for the fact its a new account and on a new account you don’t tend to get too much spam right away. also, i want to make sure your getting all your emails so there is no question that your email account is having issues. but if you had your domain name for a while and it was active on the net, you will see that your spam will increase and increase over time.
if you are interested in using this feature, below is a link directly to SpamAssassin’s web site. take a quick glance at the FAQ’s to see if its the right fit for you:
http://spamassassin.apache.org/
just keep in mind….. it may create false positives, especially if the sender sending email to you is on a known blacklist.
want to enable it on your account? Contact me.
MAC Mail Setup:
General Information:
Some helpful links:
- https://www.siteground.com/tutorials/email/mac-mail.htm
- http://www.plus.net/support/email/setup/mail-107-settings.shtml
- https://discussions.apple.com/message/19408099#19408099 — 5th message down for the “offline” message. | then the 7th message down.
Yahoo Main Server Info:
Yahoo seems to be making changes to their email settings. If you have an email account with yahoo and it doesn’t seem to get to its destination, take a look at their settings to verify you have it correct. below is a direct link to Yahoo.com’s mail setting page.
Good Lick!
https://help.yahoo.com/kb/mobile-mail/imap-server-settings-sln4075.html
OS X Yosemite: If your certificate isn’t being accepted
If a certificate is not accepted, it may have expired or it may be invalid for the way it’s being used. For example, some certificates may be used for establishing a secure connection to a server but not for signing a document.
The most common reason a certificate isn’t accepted is that the certificate authority’s root certificate isn’t trusted by your computer. To have your computer trust a certificate authority, you must add the certificate authority to a keychain and set the certificate trust settings.
-
If an app (such as Safari) displays the root certificate from the certificate authority as part of the message from the certificate authority. Drag the root certificate icon to the desktop.
-
Drag the certificate file onto the Keychain Access icon, or double-click the certificate file.
-
Click the keychain pop-up menu, choose a keychain, then click OK.
If you’re asked, enter the name and password for an administrator user on this computer.
-
Select the certificate, then choose File > Get Info.
-
Click the Trust disclosure triangle to display the trust policies for the certificate.
-
To override the trust policies, choose the trust settings you want to override from the pop-up menus.
For more information, see Certificate trust policies.
